Encoding with x265
Starting out
This tutorial will be about encoding in the Windows command line. We'll be using an Avisynth/avs4x265/x265 combo.
Before we get started, you need to download/install the following programs:
- Avisynth/Avisynth+
- AvsPmod/AvsPmod (Avisynth+)
- FFMS2
- Avs4x265.exe
- x265.exe
- MKVtoolnix
Creating the Avisynth script for input
Open up AvsPmod and start a new file. After extracting FFMS2 from the 7z archive it comes in, drag ffms2.dll from the x86 folder into the AvsPmod editor.
You should now see something similar to this appear:
LoadPlugin("ffms2-2.22-msvc\x86\ffms2.dll")
This imports the FFMS2 Avisynth plugin we'll be using to load the source video file we wish to encode.
Now we need to load the actual video file itself. Start by typing FFMS2("") on a new line. Then put the text cursor in between the quotes 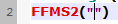 , before going edit > insert > filename. Search for the video file you wish to encode and click open. The path to the video file you selected should now appear between the quotes like this:
FFMS2("C:\videos\my_video.mp4")
Now click the video preview button at the bottom left of the AvsPmod window, to preview your video file. 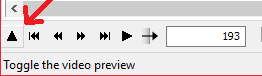 The video preview may take a little while to appear after clicking the little up facing arrow button. This is because FFMS2 is indexing the video file. This may take up to a couple of minutes if your video file is large > 3-5GiB. You will notice high disk useage during this time. Faster storage devices such as SSDs will reduce the amount of time indexing takes.
If your video shows up just fine in the video preview, then you've sucessfully created the Avisynth script. If not, the video format of the source file may not be supported by FFMS2. Either that or there is some other error. The error will appear as red text in the video preview, and should give some insight as to where you went wrong. Remember Google is your friend.
After sucessfully creating the Avisynth script, save it. We will use this script file later on.
Encoding from the .avs script
We'll now be using the Avisynth script file you created to encode your source file into x265.
First extract avs4x265.exe from the 7z archive it comes in. Next extract x265.exe from the 7z it comes in. If you're having trouble deciding which x265 version to download, select the "none" version under "Default branch VS 2015 clean builds". Only select the others if you have an AVX, or AVX2 capable CPU.
Once that is done, open command prompt (cmd). Begin by entering the path to avs4x265.exe e.g:
"C:\Software\avs4x265.exe"Followed by --x265-binary and the path to x265.exe:
"C:\Software\avs4x265.exe" --x265-binary "C:\Software\x265\x265-8b.exe"Then followed by your x265 settings:
"C:\Software\avs4x265.exe" --x265-binary "C:\Software\x265\x265-8b.exe" --preset slow --crf 22Then the output path:
"C:\Software\avs4x265.exe" --x265-binary "C:\Software\x265\x265-8b.exe" --preset slow --crf 22 --output C:\videos\my_video_x265_output.hevcAnd finally, the path to the Avisynth script file you have created, and saved:
"C:\Software\avs4x265.exe" --x265-binary "C:\Software\x265\x265-8b.exe" --preset slow --crf 22 --output C:\videos\my_video_x265_output.hevc C:\videos\my_video.avs

Now hit enter and the encode should start! If everything goes well, after x265 finishes up you should have a .hevc file at the output path you specified. This is the encoded video track (no audio - we only encoded video). To be able to play the resulting .hevc file, we must place it inside a container file, such as an .mkv or .mp4. This is where we use MKVtoolnix.
Open MKVtoolnix, and drag the .hevc file into the source files box. Check the output file name, make sure it is one you want then click start muxing. Once muxing is finished, you will have a playable x265 encoded video file, which contains no audio. Congratulations.
